
this page includes affiliate links. I may receive a small commission at no extra cost to you, if you click and purchase. I only recommend products that I have personally used.
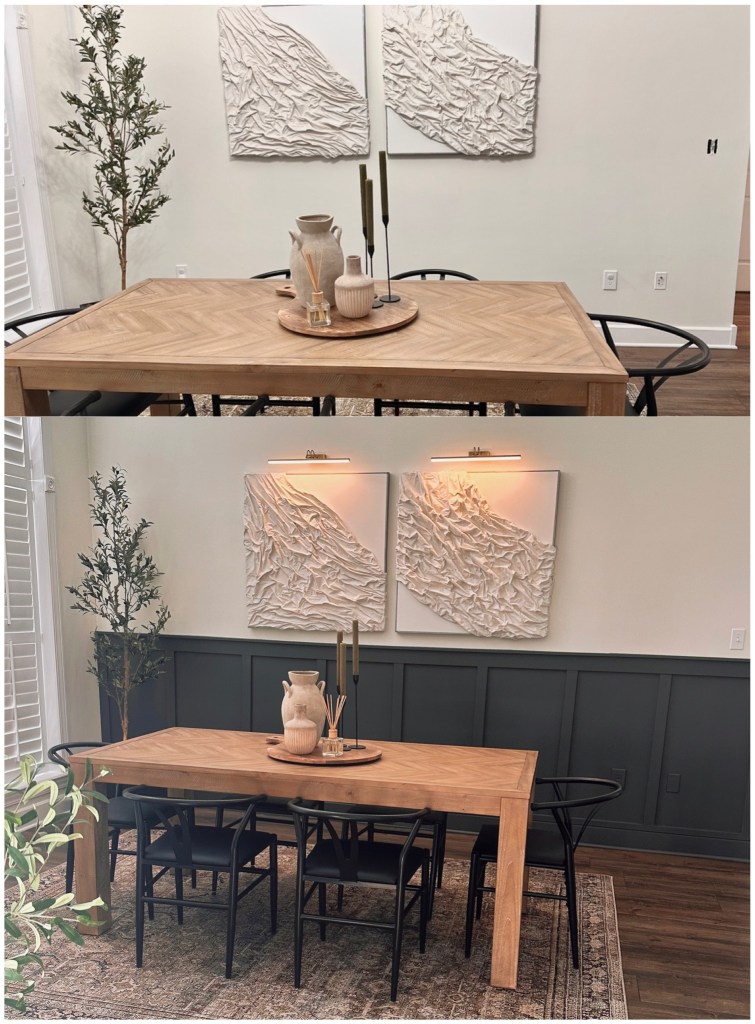
I walked into my dining room one day, and it just felt empty. I’ve wanted the “all white and neutral” look for a while, but I’ve come to realize that dark neutrals will always be my go to. This board and batten wall was just what my dining room needed to feel just a little more like home!
What you will need:
- 1×4 MDF Moulding
- 1×3 MDF Moulding
- 1×2 MDF Moulding
- Caulk
- Wood Filler
- Sand Paper
- Nail Gun
- Liquid Nails (if you plan to do this project alone)
- Laser Level and Laser Stand (optional)
- Level
Step by Step:
- Measure your wall to see how much of the MDF you will need
- Our wall is a little over 14ft wide. At the time, all I could find were 12ft and 8ft pieces of the 1×4. We bought a 1x4x12 and a 1x4x8 and cut to fit. FUN FACT: they have them in 1x4x16 at Home Depot!! *Don’t be impatient and research more options* (Lesson Learned) The 1×4 will be your top/widest piece of the board and batten wall.
- I used one 1×2 directly on top of the trim. Our trim has a slight curve on top, so placing the 1×2 on top of the trim allowed us to place the vertical MDF flush above it.
- The second 1×2, was placed on top of the 1×4 to give it a slight shelf look
- The 1×3’s is what you will use for the vertical pieces of your board and batten wall. I didn’t want to move my art that was already on the wall, so to leave around 4 inches between the artwork and the board and batten wall, we cut our 1×3’s into 3ft pieces.
- Decide how tall you want your board and batten wall to be. I used my laser level to line up exactly how high I wanted to go, and also marking 5 inches below that line (to count for the 1×4 and 1×2 that will be placed on top).
- Place your 1×2 on top of your trim first. If you are doing this project alone, using liquid nails will keep the board in place long enough for you to nail it in.
- Measure from your bottom 1×2 to the second laser line (where the bottom of your 1×4 will be), to determine the length of your 1×3’s.
- Place a 1×3 on each end of the wall, and measure how far it is in between the two to determine how many 1×3’s you will need. (ours are 18 inches apart, and we used 9 1×3’s total)
- Remember, everyones measurements will be different depending on the size of your wall
- Be sure to use a level or a laser level to make sure they are perfectly straight.
- After nailing in your 1×3’s, place your 1×4 on top
- The second 1×2 is then placed flat on top of your 1×4, giving it a slight shelf look
- After your MDF is level and nailed in, you will use wood filler for any gaps, and caulk around each board to finish off your flush look.
- Sand each board until they are all smooth, prime, and paint!
**I have had a lot of questions about my Pendant Lights above my artwork. They are WIRELESS and controlled by a handy little remote! The perfect icing on the cake for the “home feel” in our dining room!**
TIPS:
I painted the wall before placing the boards to make the painting of the board and batten wall a little easier. I also had help when nailing them in, so I personally did not need the liquid nails. Be sure to vacuum and wipe down the wall before applying paint!

Leave a comment